Steam link
Meta/Oculus Quest 2/3 and Oculus Quest Pro
This article provides recommendations on how to solve some common issues you may encounter when launching ARVI VR-produced games and other content. We have also included step-by-step instructions for adjusting the settings properly to ensure an optimal experience with both older and newer VR setups.
📌Optimal Resolution Scale
When we talk about PC games, they render only one image, whereas VR games render two images (to the left eye and the right eye). That is why, for the best quality launch of the content, it is crucial to have an optimal resolution scale both in the headsets and on monitors.
Let’s start with the Display Resolution
!Note! Downsize the resolution for all monitors!
We recommend downsizing it depending on the proportions of your monitors to alleviate the heavy strain on your video cards. Please find the instructions on how to do that below.
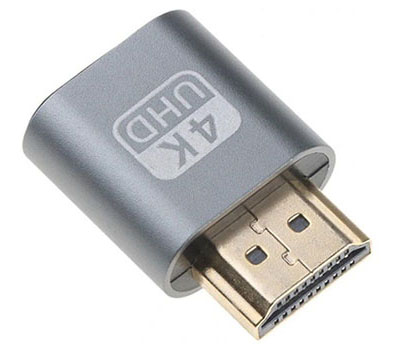
If you have a monitor emulator HDMI adapter, please downsize the resolution as well.
|
We recommend downsizing it depending on the proportions of your monitors to alleviate the heavy strain on your video cards. Please find the instructions on how to do that below. If you have a monitor emulator HDMI adapter, please downsize the resolution as well. |
➡️ Display Resolution
1. Click on the right part of the mouse while on your regular home screen
2. Choose “Display settings”

3. Click on “Display”
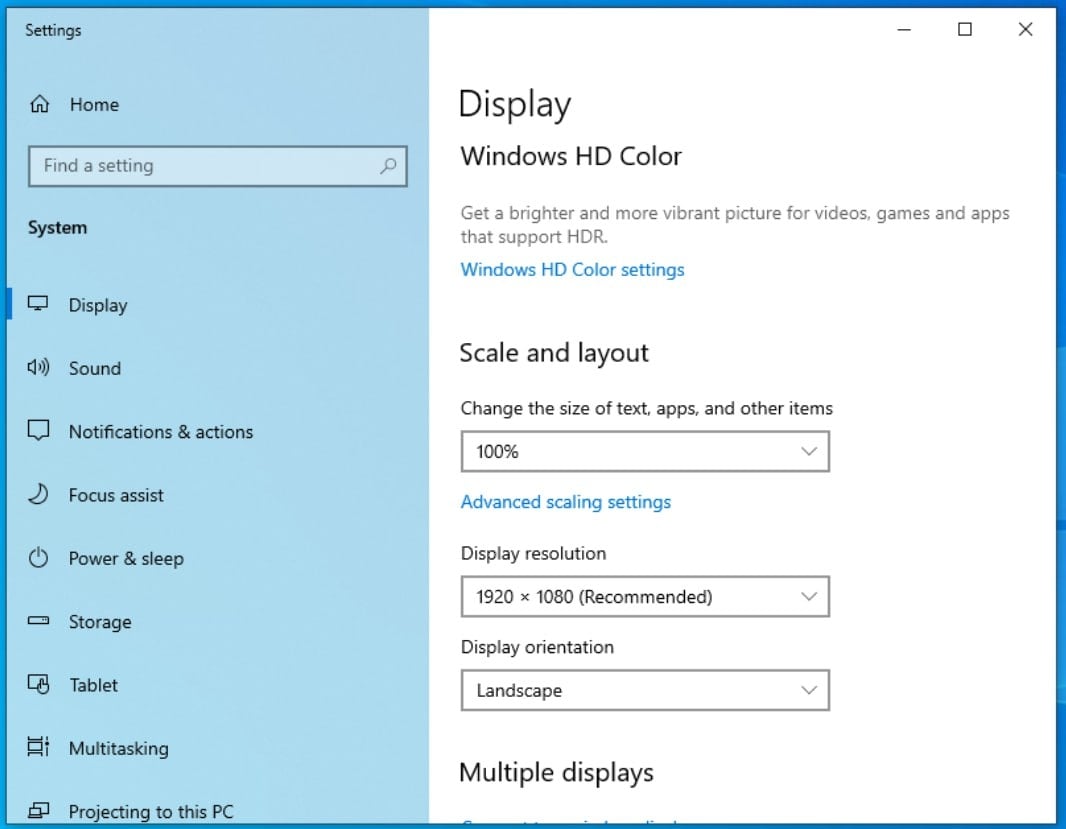
4. Select (1024 x 768/ 1280 x 768/ 1360 x 768/ 1366 x 768) depending on your monitor proportions. We recommend selecting optimal - 1366 x 768 in the “Display resolution” field.
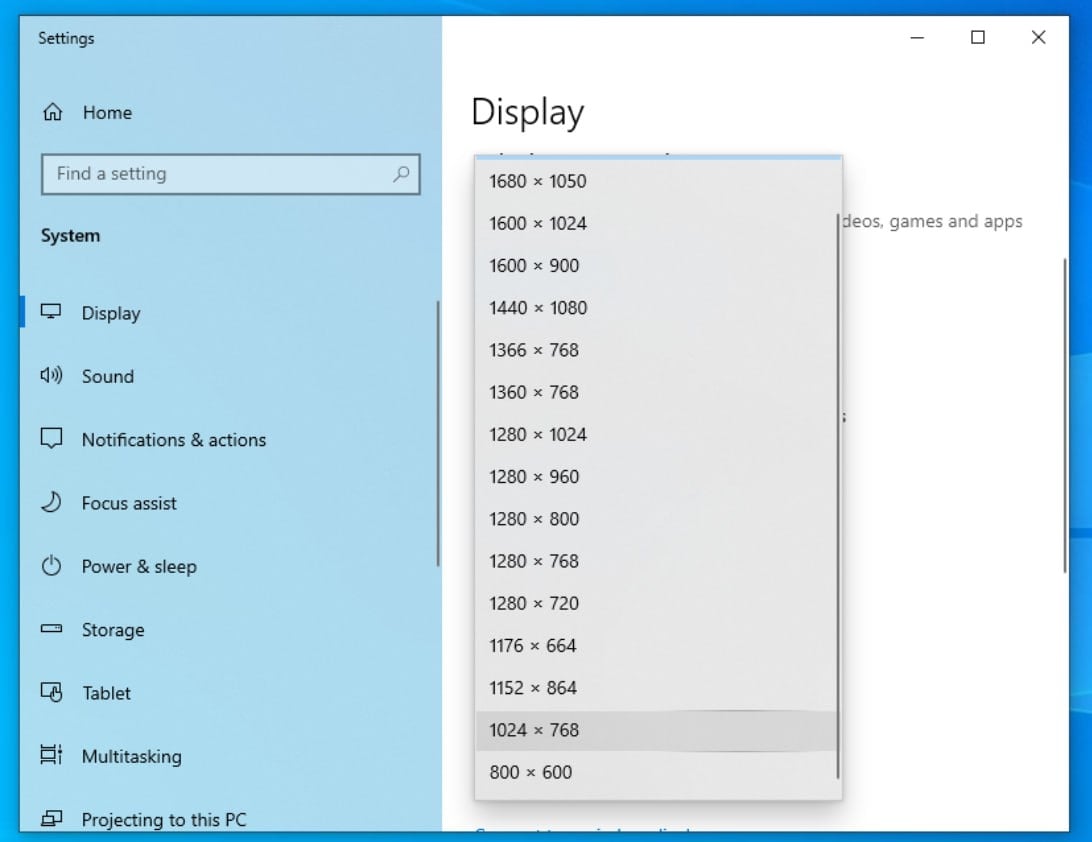
☝️ If you use any additional screens, where the gameplay is broadcasted/any advertisements run - reduce their resolution to 720 p.
!Note! If you set :
- 720 p (1m pixels)
- 1080 p (2m pixels)
- 4k p (8m pixels)
seems like a tiny change, but in fact, it increases the load on your GPU by 2 or even 8 times.
Now let’s talk about the resolution scale in the headsets
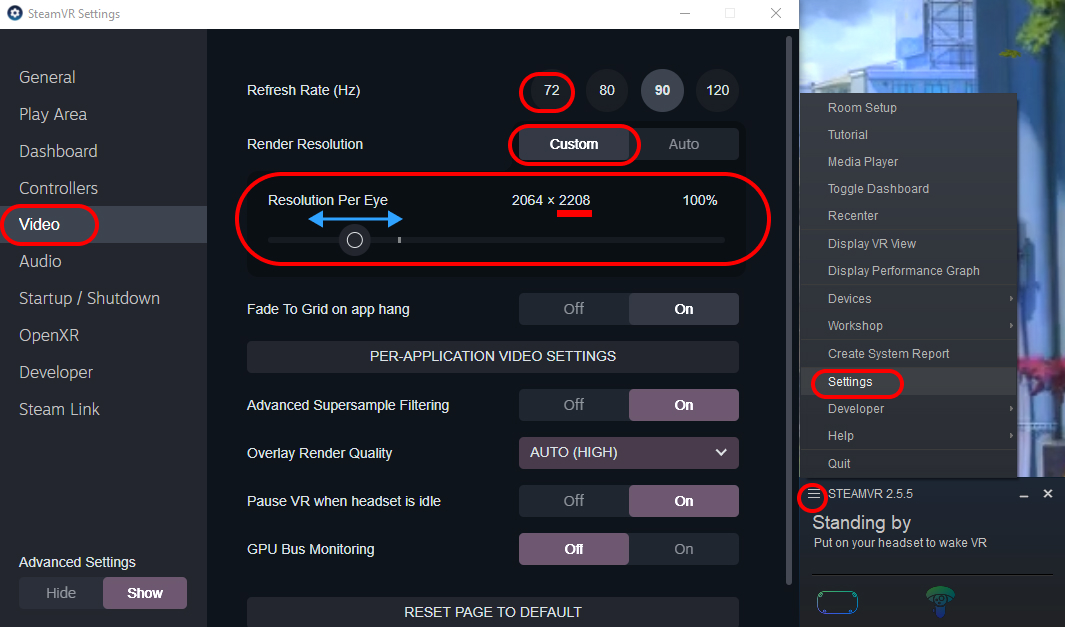
➡️ Steam VR Resolution
!Note! Adjust the resolution only after making sure no games are launched!
- Open SteamVR
- Click on the sign “Menu”
- Choose “Settings”
- Click on the field “Video”
- Switch “Render resolution” from Auto to Custom!
- Adjust your “Resolution Per Eye” depending on your type of video card. Look at the image to find what resolution to set, and pay attention to the height of the image (second value): 👉 Steam VR
- Make sure your “Refresh rate” is 72 Hz
📌CPU
One of the other elements you should pay attention to is the CPU and its load as it directly influences the quality of the game.
!Note! Make sure that no sessions are launched when checking your СPU load.
We recommend checking it at least a couple of times in different circumstances:
- a few minutes after you turn on your PC;
- after all the bookings are completed or a couple of sessions have already been finished.
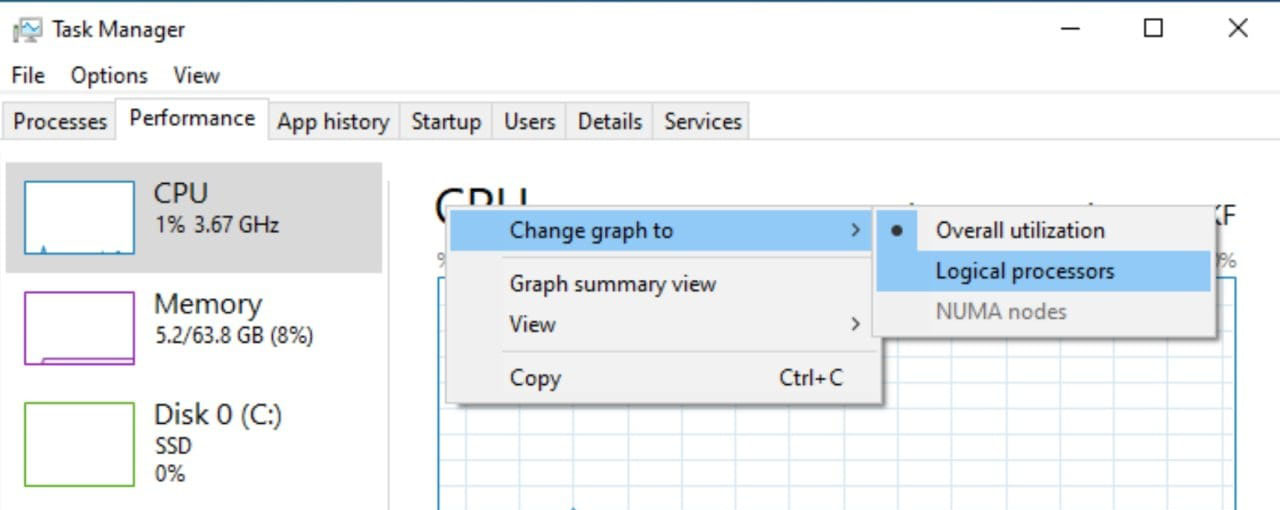
To check the CPU load in detail:
- Click on the “Performance”
- Choose “Change graph to”
- Select “Logical processors”
Pay attention to:
- the “Utilization” field should be no more than 2-4%
- The percentage in the “Utilization” field should be stable and not change rapidly
- All the logical processors should be free
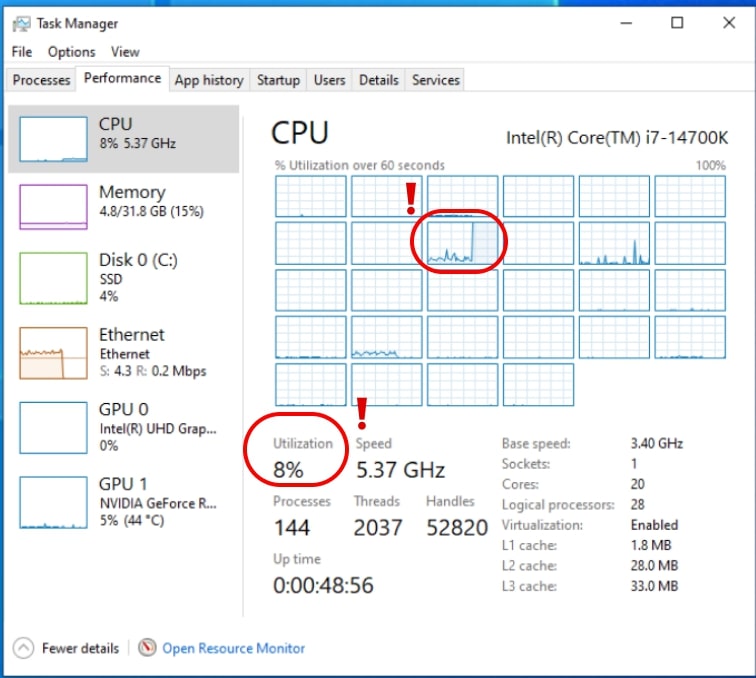
If any of the following conditions are NOT met:
- the “Utilization” field shows more than 2- 4%
- the percentage is unstable and rapidly changes
- if one of the logical processors is fully loaded
📌GPU
It is crucial to ensure that your GPU’s load is not high when launching the games.
!Note! Make sure that no sessions are launched when checking your GPU load.
We recommend checking it at least a couple of times in different circumstances:
- a few minutes after you turn on your PC
- after all the bookings are completed or a couple of sessions have already been finished.
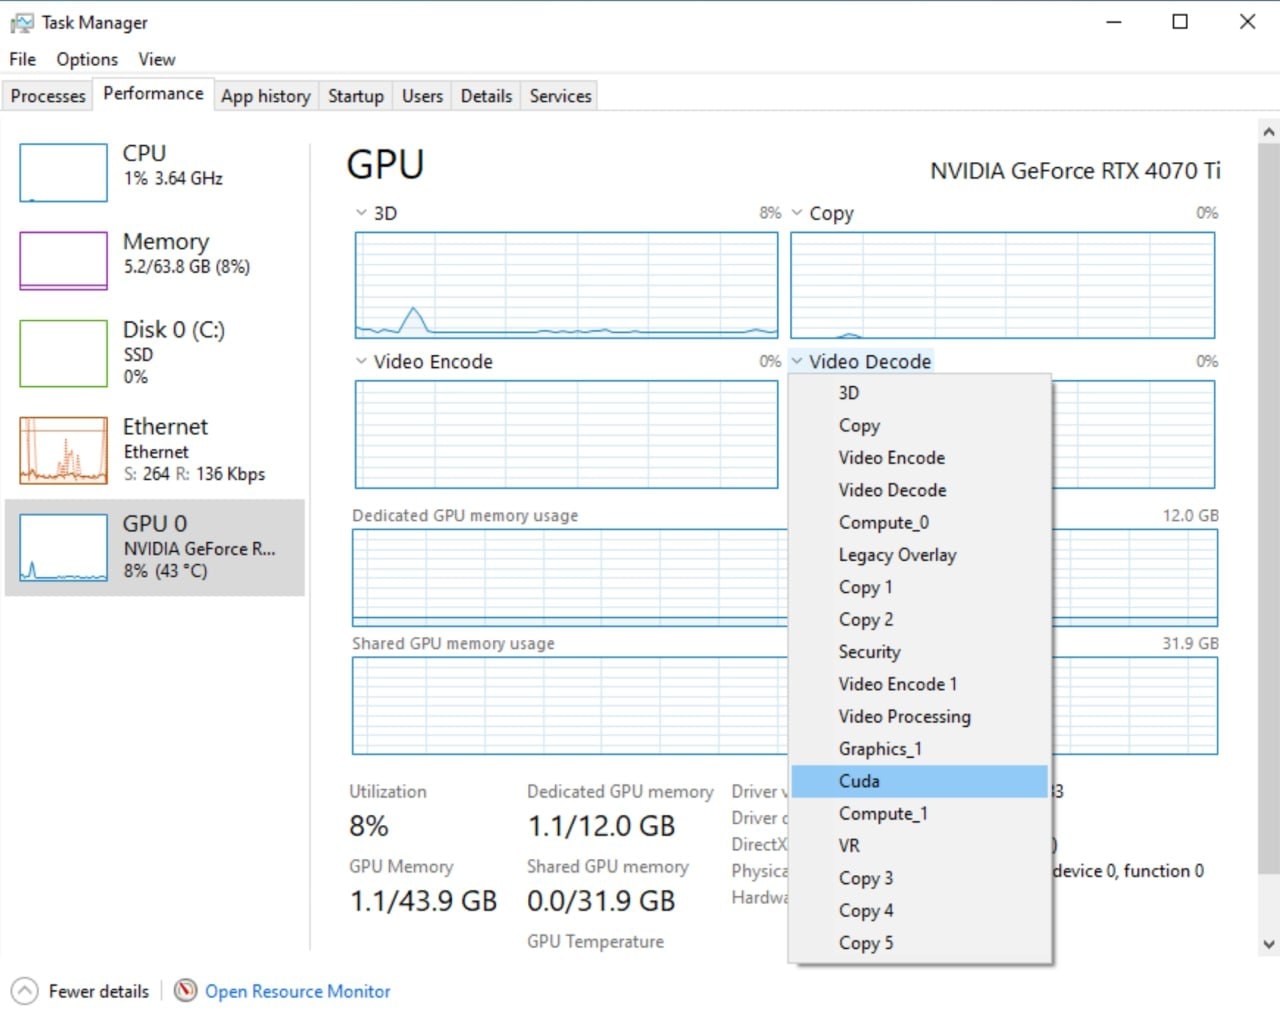
To check it appropriately, you need to review the load in detail:
1. Click on the “Performance”
2. Choose “Change graph to”
3. Select “Multiple engines”

4. Click on “Video decode” and change it to “Cuda”
Please pay attention to:
- the “Utilization” field should be no more than 2%
- “Dedicated GPU memory usage” field should be close to 0 GB
!Note! In case SteamVR is open 1GB is considered normal - “Cuda” should be 0%
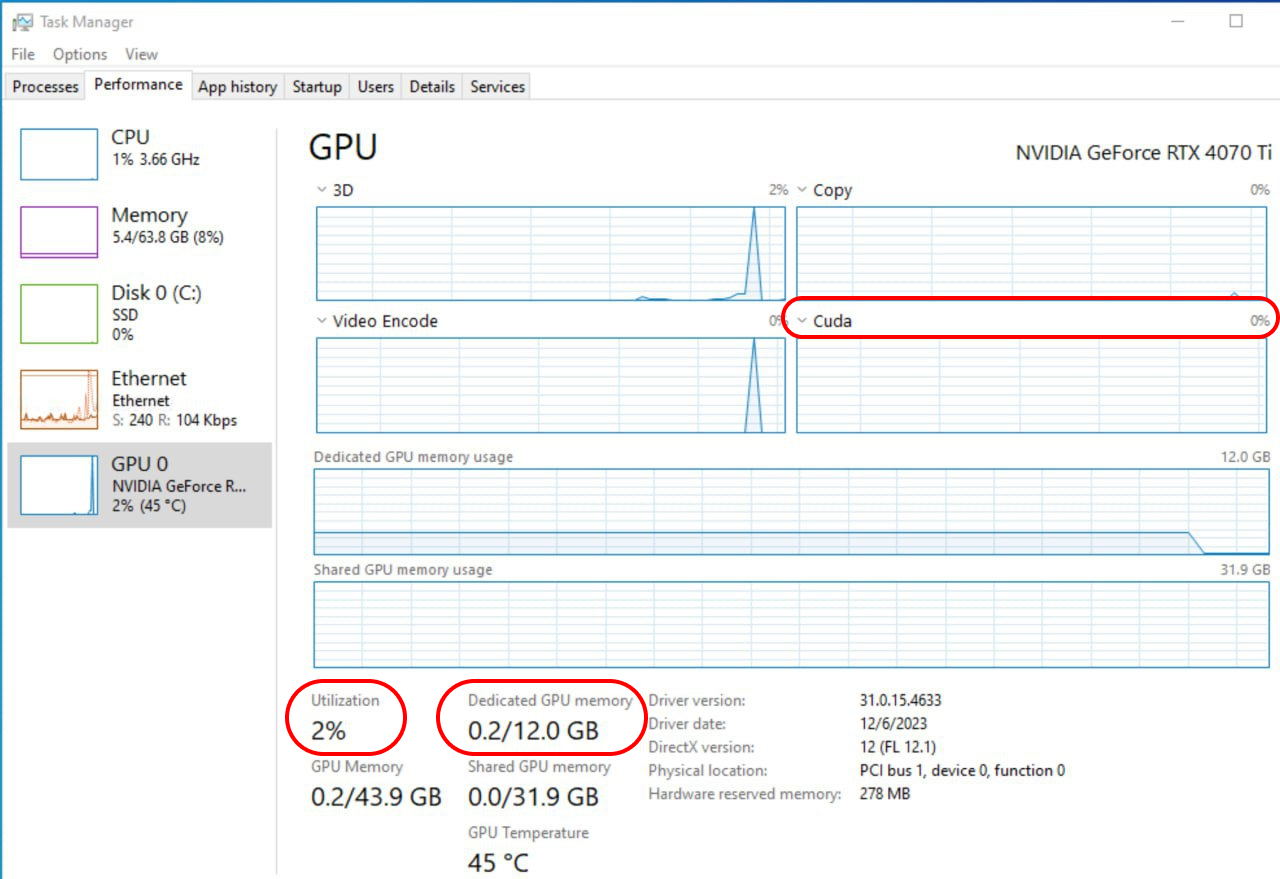
If any of the following conditions are NOT met:
- the “Utilization” field shows more than 2%
- “Cuda” is more than 0%
- “Dedicated GPU memory usage” is more than 1GB
📌RAM
Please note that RAM is not only used for data storage but also it is used by the game when the GPU’s memory is not enough. In other words, RAM is crucial for the quality of the content performance.
We have witnessed many cases where RAM is occupied by many additional programs in the background when trying to launch sessions, which causes a lot of issues. That is why, please make sure you have enough free space to launch the game. The minimum recommended requirement for Dream Hackers and future releases is 32GB.
!Note! Make sure that no sessions are launched when checking your RAM load.
We recommend checking it at least a couple of times in different circumstances:
- a few minutes after you turn on your PC;
- after all the bookings are completed or a couple of sessions have already been finished.
Pay attention to the field “In use”, if you have more than 4-5GB, please optimize the background. Our technical support team will be happy to assist you with that, so do not hesitate to contact them.

❌ system monitor programs (Task Manager, CCleaner, etc.) lead to stability of the performance issues
When we were developing the Admin Panel, one of our main goals was to create it in a way that minimizes strain on your video cards. We send 2 images per second, which is optimal for video card performance and sufficient for gamemasters to assist clients effectively. Therefore, please ensure that none of the programs listed above are open when launching the sessions, as they can put additional strain on your video cards and consequently degrade content production.
📌 Small investments that lead to enhanced performance
We understand that there are concerns and risks involved when discussing investments, and not all of you may be willing to take this step. Therefore, we have compiled recommendations for less costly upgrades that will drastically improve the performance of the PCs.
➡️ RAM recommendations (35 USD per PC)
The cheapest investment you can make that will drastically improve the performance of the PCs and will tremendously downsize the heavy strain on the video cards is upgrading the RAM. We have seen many cases where small RAM volume is the main cause of the content launch issues.
-
If there is insufficient GPU memory → the game starts using → RAM. Consequently, the frame rendering speed decreases by 2 times. Because the RAM speed is 20 times slower than GPU RAM.
Pay attention to the field “Shared GPU memory” which indicates additional usage from RAM.
!Note! Check only when the session is launched.

-
If there is insufficient RAM, → the game then starts using → the page file on the SSD. Consequently, the frame rendering speed decreases to the point where the game won’t launch at all.
Example:
Game Requirements:
- The game requires 20 GB of RAM for a successful launch
Your Resources:
- You have only 16 GB of RAM available
- Out of this, 5 GB is already occupied by the system
Game Launching Process:
- The first 11 GB of the game loads into the RAM
- The remaining 9 GB must be loaded from the SSD as the RAM is already full
The Usage of page file on SSD:
- The additional 9 GB of the game will be loaded into a page file on the SSD
- This means data is being loaded from disk to disk, significantly slowing down the launch process
Consequences:
- The time of the launch usually takes 1 minute, in this case, it can take 20-40 minutes
- When the game uses the data from the page file, the switch between the locations in the game will take 30-60 seconds instead of 1-2 seconds. FPS will go from regular 72-90 to 10-20
Please find the illustrated principle of the Windows operating system below.
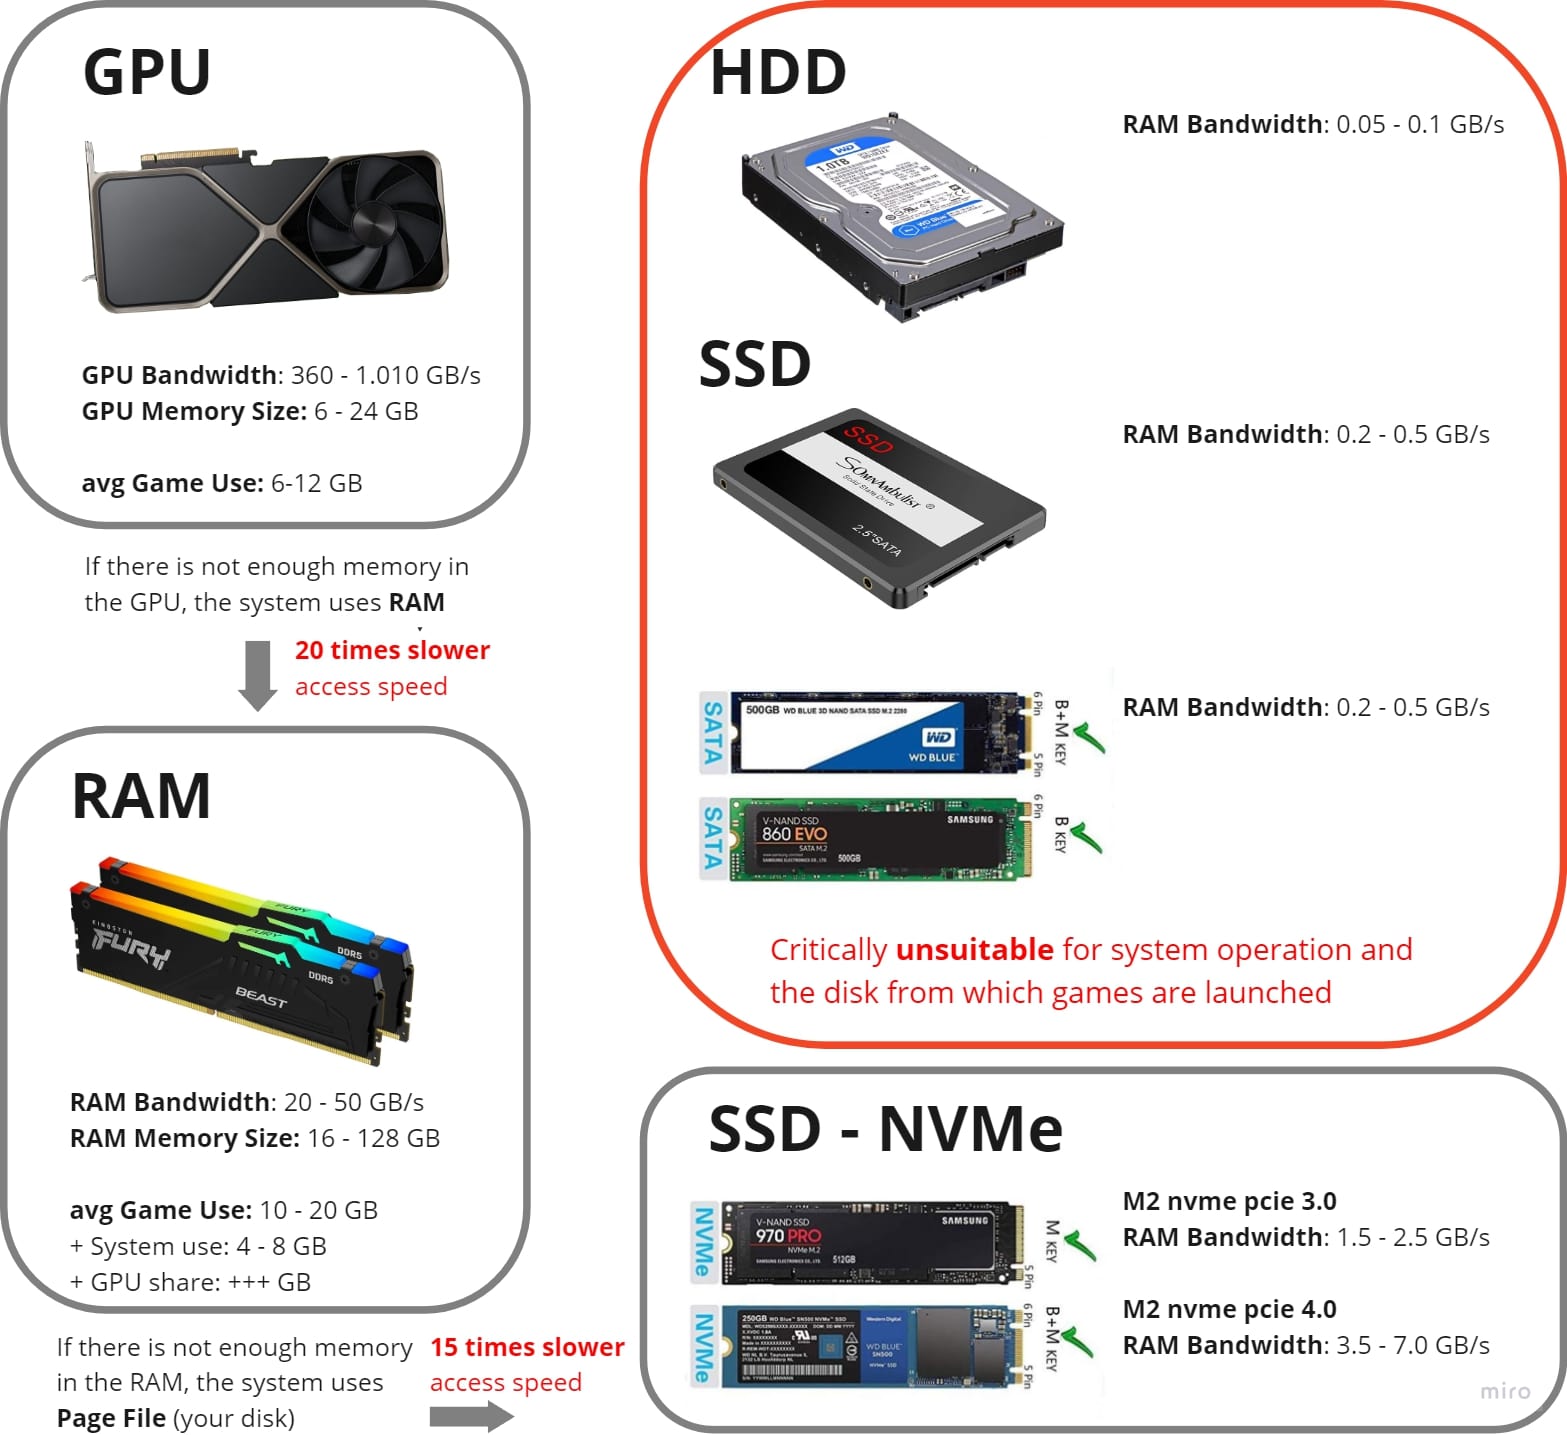
Even if the GPU is not very powerful, increasing the RAM will ensure the game has enough memory and does not need to use the SSD page file. Therefore it guarantees you a smooth performance of the content.
We recommend expanding your RAM to 32GB for optimal performance of the content. 32GB will definitely be topical for the next couple of years.
After you have upgraded your RAM, consider investing in new SSDs. RAM influences the overall performance of the content, whilst a powerful SSD will speed up the time of the launch.
➡️ SSD recommendations (70 USD per PC/ the launch time speeds up by 2-4 times)
Many of you reported the “long time of launch” and shared some suggestions on how to fix it. As we mentioned before, Dream Hackers and future releases are way heavier than our previous games, which is why the time of the launch can not possibly be the same.
| Alice (previous generation game): file size 2.68GB
|
Gunslinger: file size 13.2GB
|

|

|
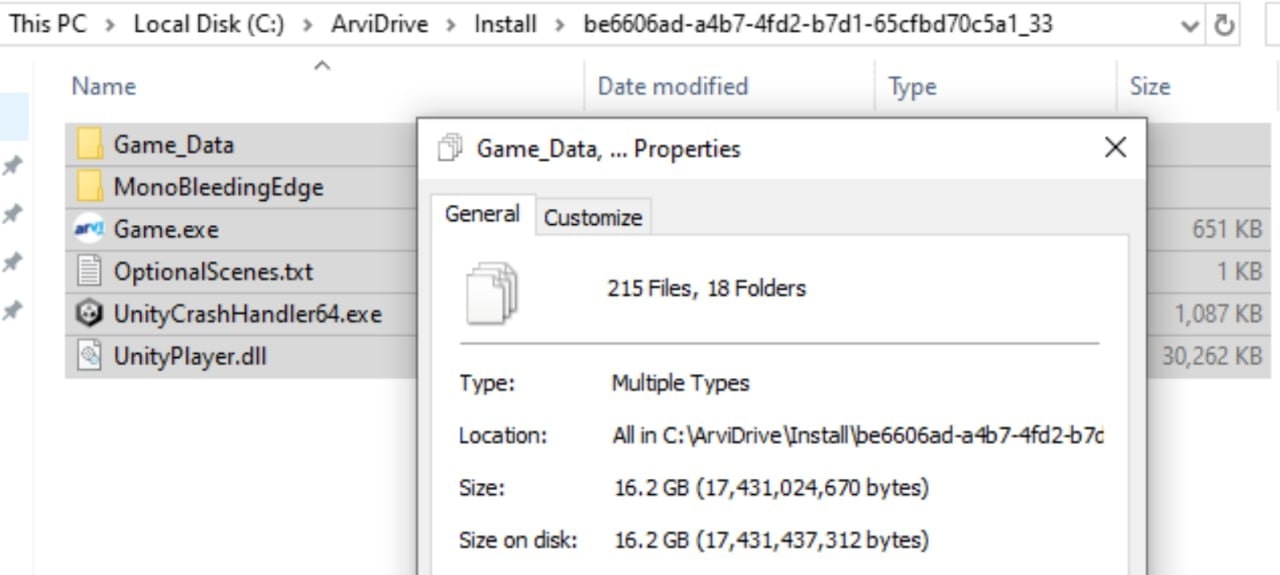
| Dream Hackers: file size 16.2GB
|
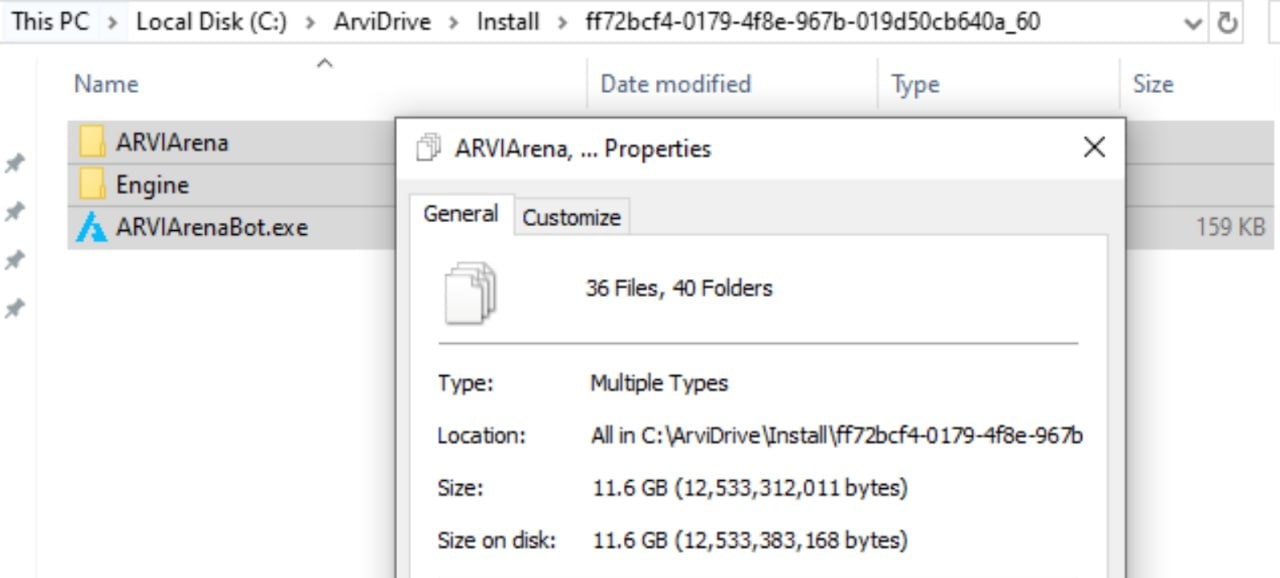
Future release: file size 11.6GB
|
|
|
We do not plan to redesign the launching logic of Dream Hackers to a "part-by-part" approach, as some of you suggested. We believe potential clients would not be satisfied with facing a black screen for a minute each time they complete a part of the game.
If you have a powerful SSD, the time of launch can be reduced. But if you have an SSD with slow speed, there is nothing that can be done. That is why we recommend investing in a new SSD and will be more than happy to find a great deal that suits you. We recommend using m2 nvme hard drives because of their high read speed.
Please look at the example below, there is a 10 EUR difference between the two SSDs. The more expensive SSD is 6 times faster than the cheaper one and offers more storage capacity.

We recognize that upgrading the GPU may be quite expensive. But if you are willing to invest, we recommend buying:
| Optimal GPU (4070ti Super)
|
Limited budget GPU (4060ti for 16GB) |

|

|